 Skip to content
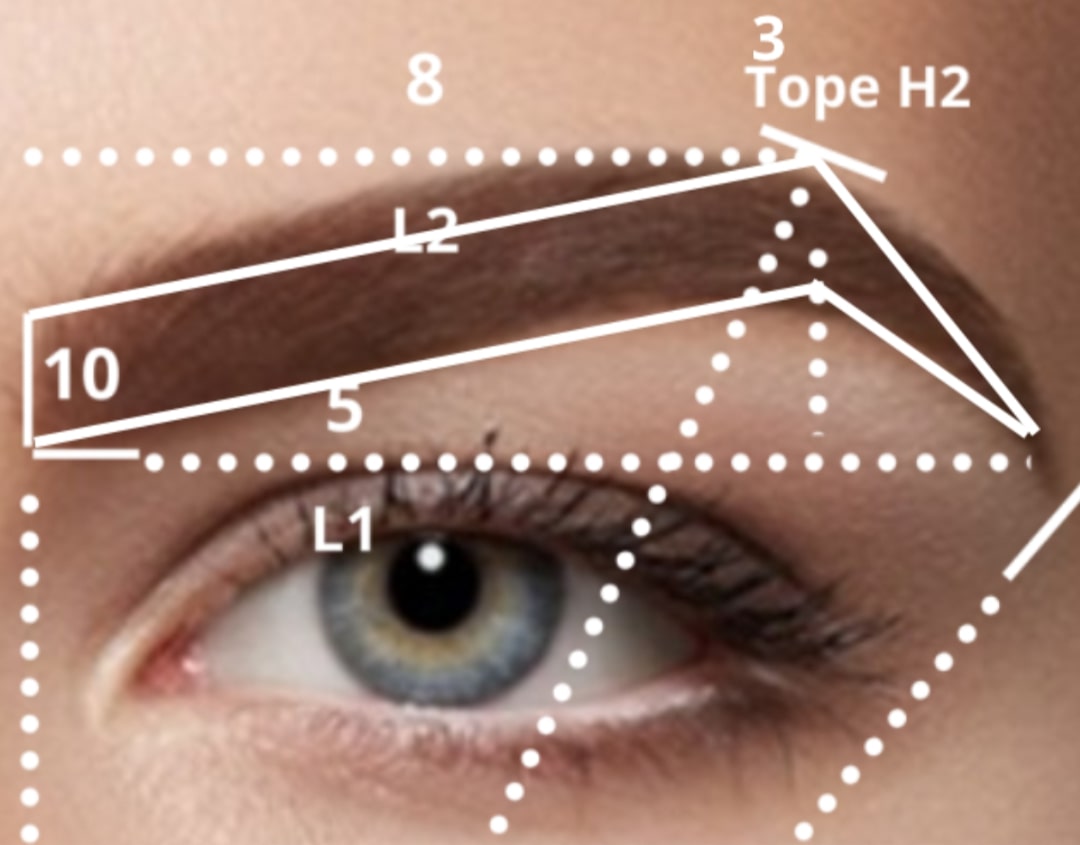
You may be interested in: How to do eyebrow shading with henna
This step by step to design eyebrows takes into account more precise measurements that are projected with the exact length to the other eyebrow to achieve a symmetrical design that matches the face. You will achieve this with a pachymeter, also known as a vernier or caliper. The curvature, thickness and length of the eyebrows will depend on each particular case:
- Mark the middle of the eyebrows: We start with a white pencil and a pachymeter. Using the center of the nose and Cupid’s bow (the top of the lip), mark the middle of the eyebrow. This initial reference will be crucial for the rest of the process.

- Mark the beginnings of the eyebrows: Using the pachymeter again, mark the starting points of the eyebrows. The measurement will depend on the dimensions of the eyebrow and the natural hairline. This measurement will be between 2 cm, 2.5 cm or 3 cm. Make sure the distance between the beginnings of both eyebrows is equal.

- Check distance: Before proceeding, verify that the distance between the beginnings of both eyebrows is symmetrical. This is essential to achieve a balanced design.

- Measure the total length of each eyebrow: Measure the total length of your eyebrows from the starting point you marked earlier. Make sure to respect the natural length of your eyebrows.

- Transfer the length to the other eyebrow: Use the pachymeter to transport the length L1 to the other eyebrow and mark with the white pencil. The goal is to ensure that both eyebrows have the same size.

- Mark the height of the arch: Mark the height of the upper arch of the eyebrow using the white pencil and the pachymeter. This height will depend on your facial features and personal preferences.

- Replicate the height on the other eyebrow: As before, use the pachymeter to transport the height of the arch to the other eyebrow. Mark with the white pencil and make sure both eyebrows are the same height.

- Design the first eyebrow: Now it’s time to design one of the eyebrows. Use the references you have marked so far. A white pencil with a thin tip will help you achieve precise strokes. Once you’ve finalized the design, use a microbrush to refine the strokes for a more polished look.

- Project the design to the other eyebrow: Once the design of the first eyebrow is ready, project and mark the strokes of the tail, base, height and arch using a thread as a guide. Double check that the measurements are identical.

- Design the second eyebrow: Based on the previous projections and measurements, design the second eyebrow. Use the thread as a reference to ensure that the beginnings, length and height are the same on both eyebrows.

- Refine the details: Remove the design guidelines and spend time fine-tuning the brow details. You may need to make subtle adjustments to achieve perfect symmetry and a natural look.

Remember, each face is unique, so measurements and shape may vary depending on personal characteristics. Follow this tutorial and you will achieve a fabulous, symmetrical eyebrow design that will frame your client’s face harmoniously!
You may be interested in: What materials are needed to do eyebrow micropigmentation?
In the following video you can see step by step how to do an eyebrow design:
You may be interested in: How to do eyebrow shading with henna
This step by step to design eyebrows takes into account more precise measurements that are projected with the exact length to the other eyebrow to achieve a symmetrical design that matches the face. You will achieve this with a pachymeter, also known as a vernier or caliper. The curvature, thickness and length of the eyebrows will depend on each particular case:
- Mark the middle of the eyebrows: We start with a white pencil and a pachymeter. Using the center of the nose and Cupid’s bow (the top of the lip), mark the middle of the eyebrow. This initial reference will be crucial for the rest of the process.
- Mark the beginnings of the eyebrows: Using the pachymeter again, mark the starting points of the eyebrows. The measurement will depend on the dimensions of the eyebrow and the natural hairline. This measurement will be between 2 cm, 2.5 cm or 3 cm. Make sure the distance between the beginnings of both eyebrows is equal.
- Check distance: Before proceeding, verify that the distance between the beginnings of both eyebrows is symmetrical. This is essential to achieve a balanced design.
- Measure the total length of each eyebrow: Measure the total length of your eyebrows from the starting point you marked earlier. Make sure to respect the natural length of your eyebrows.
- Transfer the length to the other eyebrow: Use the pachymeter to transport the length L1 to the other eyebrow and mark with the white pencil. The goal is to ensure that both eyebrows have the same size.
- Mark the height of the arch: Mark the height of the upper arch of the eyebrow using the white pencil and the pachymeter. This height will depend on your facial features and personal preferences.
- Replicate the height on the other eyebrow: As before, use the pachymeter to transport the height of the arch to the other eyebrow. Mark with the white pencil and make sure both eyebrows are the same height.
- Design the first eyebrow: Now it’s time to design one of the eyebrows. Use the references you have marked so far. A white pencil with a thin tip will help you achieve precise strokes. Once you’ve finalized the design, use a microbrush to refine the strokes for a more polished look.
- Project the design to the other eyebrow: Once the design of the first eyebrow is ready, project and mark the strokes of the tail, base, height and arch using a thread as a guide. Double check that the measurements are identical.
- Design the second eyebrow: Based on the previous projections and measurements, design the second eyebrow. Use the thread as a reference to ensure that the beginnings, length and height are the same on both eyebrows.
- Refine the details: Remove the design guidelines and spend time fine-tuning the brow details. You may need to make subtle adjustments to achieve perfect symmetry and a natural look.
Remember, each face is unique, so measurements and shape may vary depending on personal characteristics. Follow this tutorial and you will achieve a fabulous, symmetrical eyebrow design that will frame your client’s face harmoniously!
You may be interested in: What materials are needed to do eyebrow micropigmentation?
In the following video you can see step by step how to do an eyebrow design:
